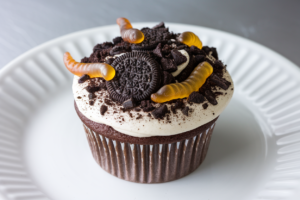
Picture this: a room full of adults pretending they grabbed a dessert “for the kids.” That’s the power of Worms in Dirt Cupcakes. They’re nostalgic, ridiculously photogenic, and taste like childhood plus a glow-up. Soft chocolate cupcakes, creamy frosting, crushed Oreo “soil,” and wriggly gummy worms.
It’s cute chaos in dessert form—and it always gets demolished first. You bring these, you win the room.
Why You’ll Love This Recipe
- Instant crowd-pleaser: These are playful yet seriously delicious—chocolatey, creamy, and crunchy.
- Minimal effort, max impact: You can go from pantry to party tray fast, especially with a boxed mix hack.
- Kid-approved, adult-adored: Nostalgia meets gourmet vibes with a silky frosting and rich crumb.
- Customizable: Make them spooky for Halloween, garden-themed for spring, or add “mud puddles” of chocolate ganache.
- Great make-ahead: Bake the cupcakes in advance; decorate the day of. Zero stress, all flex.
Shopping List – Ingredients
- For the cupcakes:
- 1 box chocolate cake mix (or homemade batter for 12 cupcakes)
- Eggs, oil, and water (as per box directions)
- Optional: 1 teaspoon espresso powder (boosts chocolate flavor)
- For the frosting:
- 1 cup (2 sticks) unsalted butter, softened
- 2 1/2–3 cups powdered sugar, sifted
- 1/3 cup unsweetened cocoa powder
- 2–3 tablespoons heavy cream or milk
- 1 teaspoon vanilla extract
- Pinch of salt
- For the “dirt” and topping:
- 20–24 Oreo cookies, cream removed (or keep it—your call), crushed into fine crumbs
- Gummy worms (about 24 pieces)
- Optional: chocolate sprinkles, mini chocolate chips, or edible flowers
The Method – Instructions
- Prep your pan: Line a 12-cup muffin tin with liners and preheat your oven according to your cake mix or recipe (usually 350°F/175°C).
- Make the batter: Prepare the chocolate cake batter as directed.
For extra depth, whisk in espresso powder. It won’t taste like coffee—just more chocolatey.
- Fill and bake: Divide batter evenly among liners, filling about 2/3 full. Bake 16–20 minutes until a toothpick comes out clean.
Don’t overbake or you’ll get sad, dry cupcakes.
- Cool completely: Let cupcakes cool in the pan 5 minutes, then transfer to a rack. They must be fully cool before frosting, FYI.
- Crush the Oreos: Add cookies to a zip-top bag and crush with a rolling pin until sandy. Finer crumbs look more like soil.
- Make the frosting: Beat softened butter on medium-high until fluffy (2–3 minutes).
Add powdered sugar, cocoa, vanilla, and salt. Mix on low, then add cream 1 tablespoon at a time until smooth and spreadable. Beat 1 minute more for airy perfection.
- Frost generously: Use a piping bag with a round tip or a spoon to mound frosting on top.
More frosting = better “soil adhesion.” Science.
- Apply the “dirt”: Dip each frosted cupcake into the Oreo crumbs or spoon crumbs over the top, coating completely.
- Wiggle in worms: Press 1–2 gummy worms halfway into the “dirt.” Let some dangle for maximum drama.
- Optional upgrades: Add a drizzle of chocolate ganache before the dirt for “mud.” Or pipe tiny green buttercream “sprouts.” Overachieving? Maybe. Worth it?
Yes.
How to Store
- Room temperature: Keep in an airtight container for up to 2 days. Ideal if your kitchen isn’t hot.
- Refrigerator: Store up to 5 days. Bring to room temperature before serving so the frosting softens.
- Make-ahead tips: Bake cupcakes 1–2 days in advance, store unfrosted, and decorate the day you serve.
Add worms right before presenting so they stay perky.
- Freezing: Freeze unfrosted cupcakes up to 2 months. Thaw at room temp, then frost and top.
Nutritional Perks
- Portion control built in: Single-serve desserts keep “just one more slice” from happening. Mostly.
- Customizable sweetness: Adjust frosting sugar to taste.
You’re in charge here, not the sugar gods.
- Balance is possible: Use a darker cocoa and reduce frosting if you want a slightly less sweet bite.
- Allergy awareness: Easy to adapt for dairy-free or gluten-free needs (see Alternatives).
Don’t Make These Errors
- Skipping the cool-down: Warm cupcakes melt frosting. Melted frosting = sliding worms. Tragic.
- Huge Oreo chunks: Big pieces look messy and slide off.
Go for fine crumbs for that “soil” finish.
- Overbaking: Dry cupcakes plus crunchy cookie dirt? No thanks. Set a timer and test early.
- Too-stiff frosting: If the frosting tears the cupcake, add another tablespoon of cream and beat again.
- Adding worms too early in heat: In warm environments, gummies can weep.
Add close to serving.
Alternatives
- From-scratch cupcake option: Use your favorite chocolate cupcake recipe with buttermilk for tenderness.
- Dairy-free: Swap butter for a high-quality vegan butter and use dairy-free milk. Check gummy worms—many use gelatin; opt for vegan gummies if needed.
- Gluten-free: Use a gluten-free chocolate cake mix and certified gluten-free chocolate sandwich cookies.
- Flavor twists: Add 1 teaspoon peppermint extract to frosting for a fresh “garden.” Or orange extract for chocolate-orange vibes.
- Different “soil”: Use chocolate wafer cookies or gluten-free chocolate grahams if you’re out of Oreos.
- Less sweet option: Use stabilized whipped cream frosting, then top with crumbs and worms just before serving.
- Decoration ideas: Add candy rocks, green coconut “grass,” or tiny shovel toppers. Instagram bait?
Absolutely.
FAQ
Can I use store-bought frosting?
Yes. Whip it with a hand mixer and a splash of cream to make it fluffier and easier to spread. A touch of cocoa can deepen the chocolate flavor.
Do I need to remove the Oreo filling?
Not required.
Removing it gives a drier, more realistic “soil.” Keeping it creates slightly clumpier crumbs that still work. Your call.
How far in advance can I decorate?
Up to 24 hours ahead if refrigerated. For best texture, add worms 2–4 hours before serving, especially in warm weather.
What if I don’t have a piping bag?
Use a spoon or offset spatula to swoop on the frosting.
Rustic looks great here—nature isn’t symmetrical, and neither are “gardens.”
Can kids help make these?
Absolutely. They can crush cookies, sprinkle dirt, and add worms. Maybe don’t hand them the mixer unless you like cocoa powder confetti, IMO.
How do I make them look extra realistic?
Use very fine crumbs, press them gently into the frosting, and angle the worms like they’re crawling in and out.
Add a dusting of cocoa on top for depth.
What’s the best way to transport them?
Use a cupcake carrier or place them snugly in a tall-sided box. Chill first to firm up the frosting and keep the “landscape” intact.
Final Thoughts
Worms in Dirt Cupcakes are playful, bold, and blissfully low-effort. They scratch the nostalgia itch while still tasting gourmet, thanks to a decadent chocolate base and fluffy frosting.
Bring them to a party and watch the “just one” crowd turn into repeat customers. Simple, fun, memorable—aka the dessert trifecta. Now go make some edible “soil” and cause a little chaos.
Printable Recipe Card
Want just the essential recipe details without scrolling through the article? Get our printable recipe card with just the ingredients and instructions.
Printable Recipe Card
Want just the essential recipe details without scrolling through the article? Get our printable recipe card with just the ingredients and instructions.