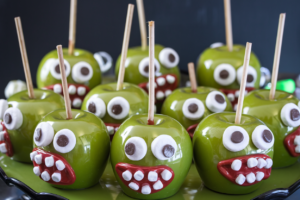
Green candy apples with marshmallow or candy eyes.
Imagine a tray of shiny, neon-green apples staring back at you like tiny goblins from a candy lab. They’re crunchy, tart, and unapologetically extra—exactly what your party, bake sale, or Friday night needs. These Candy Apple Monsters are half dessert, half decoration, and 100% crowd-pleaser.
Minimal effort, maximum “OMG did you make those?” energy. Ready to unleash edible chaos with a sugary grin?
What Makes This Special
These aren’t your grandma’s candy apples. They’re a playful mash-up of glossy green candy shells, juicy apples, and goofy marshmallow or candy eyes that turn a classic into a conversation starter.
They’re ridiculously photogenic (hello, social feeds), and kids can help decorate without turning your kitchen into a war zone.
Plus, you control everything: sweetness level, eye style, and how creepy-cute you want them. Whether you’re hosting a Halloween bash or just want a fun edible craft, these monster apples deliver a crunchy, dramatic snap with each bite.
Shopping List – Ingredients
- 6–8 small to medium apples (Granny Smith for tartness and contrast, or Honeycrisp if you like sweeter)
- Wooden sticks (popsicle sticks or sturdy skewers)
- 2 cups granulated sugar
- 1/2 cup light corn syrup
- 3/4 cup water
- Green gel food coloring (gel holds color better than liquid)
- 1/2 teaspoon vanilla extract (optional, for flavor)
- Mini marshmallows (for big goofy eyes)
- Candy eyes (for sharp, defined looks; various sizes if possible)
- Black edible marker or melted chocolate (to add pupils/mouths)
- White chocolate or royal icing (to “glue” eyes if needed)
- Cooking spray or butter (for prepping the pan)
- Parchment paper or silicone mat
- Optional add-ons: sprinkles, mini fangs (almond slivers), red gel for “blood,” coconut flakes for “hair”
The Method – Instructions
- Prep the apples like a boss. Rinse and scrub apples with hot water to remove wax (wax = slippery coating won’t stick). Dry thoroughly.
Twist off stems and insert sticks straight down into the core.
- Set your station. Line a baking sheet with parchment or a silicone mat and lightly grease it. Have your eyes, marshmallows, and decorating bits within reach. Once the candy hits temperature, it moves fast—no panic allowed.
- Make the candy syrup. In a heavy saucepan, combine sugar, corn syrup, and water.
Stir gently to moisten. Bring to a boil over medium-high heat without stirring. Use a candy thermometer and cook to 300°F (hard crack stage).
If crystals form on the sides, brush with a wet pastry brush.
- Color and flavor. Remove from heat the moment it hits 300°F. Wait for the bubbling to settle a bit. Add several drops of green gel food coloring and the vanilla.
Swirl gently to combine. Aim for a bright, monstrous green—go bolder than you think.
- Dip like you mean it. Tilt the pot and roll each apple to coat, letting excess drip back in. Hold upside down for 5–7 seconds to prevent pooling.
Place on the prepared sheet. Work quickly but confidently.
- Attach the eyes. While the coating is still tacky (within 1–2 minutes of dipping), press on candy eyes. If it’s already set, use a dab of melted white chocolate or royal icing as glue.
For marshmallow eyes, cut mini marshmallows in half, stick the cut side onto the apple, and add a dot of melted chocolate or edible marker for the pupil.
- Go nuts with personality. Draw goofy mouths, fangs, or stitches using melted chocolate in a piping bag or an edible marker. Sprinkle hair, add almond sliver fangs, or drizzle red gel for drama. Embrace the weird—crooked eyes are part of the charm.
- Let them set. Allow apples to firm up at room temperature for about 20–30 minutes.
The shell should be glossy and hard with a satisfying snap.
- Serve or stage. Display on a platter with crushed Oreo “dirt” or green coconut “grass.” If transporting, wrap individually in cellophane once fully set.
Storage Tips
- Room temp is best: Keep in a cool, dry place for up to 2 days. Humidity is the enemy—sticky shells are no fun.
- Avoid the fridge: Condensation can soften the shell and cause color bleed. If you must refrigerate, wrap tightly and bring to room temp before unwrapping.
- Make ahead: Dip the day before and decorate the same day for the freshest crunch.
- Leftover strategy: Slice leftovers and add to oatmeal, yogurt, or a sundae.
Waste nothing, flex everything.
Health Benefits
Are these dessert? Yes. But they’re anchored by whole fruit, which means fiber, vitamin C, and antioxidants from apples.
The candy shell is a treat, but the apple itself supports satiety and helps balance the sugar rush (a bit).
If you choose tart apples like Granny Smith, the flavor contrast may help you eat less overall—big flavor, fewer bites. And IMO, the psychological bonus of a fun, shareable dessert can’t be ignored. Mood counts, too.
Don’t Make These Errors
- Skipping the de-waxing step: Wax = peeling candy.
Scrub with hot water and dry well.
- Wrong temperature: Under 300°F gives a soft coat; overcooking burns. Use a thermometer, not vibes.
- Stirring post-boil: This can crystallize sugar. Once it boils, hands off.
- Decorating too late: Eyes won’t stick if the shell has fully set.
Either attach quickly or use edible “glue.”
- High humidity environment: Causes sticky shells and droopy decor. Choose a dry day or crank the AC.
- Massive apples: Bigger apples look epic but are harder to coat evenly and can crack the shell.
Alternatives
- Color swaps: Purple goblins, black nightwalkers, or slime-green—the gel is your playground.
- Flavor twists: Add cinnamon oil, lemon oil, or a touch of citric acid for sour monsters. A drop goes a long way.
- Coating change-up: Use white chocolate dyed green for a softer bite.
Add coconut oil for smoother dipping.
- Eye options: Mini marshmallows, fondant circles, white chocolate chips (flat side out), or royal icing dots with chocolate pupils.
- Diet-friendly: Try sugar-free isomalt for the shell if you’re experienced with sugar work. Otherwise, go with green chocolate coating to avoid hard-crack sugar entirely.
- Apple variety: Pink Lady, Fuji, or Honeycrisp for sweeter monsters; Granny Smith for that iconic tart snap.
FAQ
Do I need a candy thermometer?
Yes, unless you enjoy gambling. Hard crack is precise, and a thermometer makes perfect shells repeatable.
They’re inexpensive and save you from grainy syrup.
Why won’t the candy stick to my apples?
Wax is the usual suspect. Scrub thoroughly with hot water and dry. Also make sure apples are completely dry—water causes syrup to slide off and seize.
Can I make these with chocolate instead of sugar syrup?
Absolutely.
Melt white chocolate, tint it green with oil-based coloring, and dip. The shell will be softer and less shiny but still adorable and tasty.
How do I prevent bubbles in the coating?
Let the syrup settle off heat for 30–60 seconds before coloring, and avoid whipping air in. If bubbles appear after dipping, gently rotate the apple to pop them before it sets.
Can I add eyes after the apples fully set?
Yes—use melted white chocolate or royal icing as glue.
Hold each eye in place for 10–15 seconds until it grips.
What’s the best way to clean the pot?
Fill with water and bring to a boil. The sugar dissolves and cleanup becomes painless. FYI, don’t put your thermometer in the dishwasher—hand wash only.
The Bottom Line
Candy Apple Monsters are the cheeky mash-up of craft and dessert you didn’t know you needed.
They’re simple at their core—good apples, glossy green shell, and goofy eyes—but the result looks like pro-level patisserie mischief. Make them once, and you’ll be the friend who “does the cool treats” at every party. Sweet, spooky, and totally snackable—what’s not to love?
Printable Recipe Card
Want just the essential recipe details without scrolling through the article? Get our printable recipe card with just the ingredients and instructions.
Printable Recipe Card
Want just the essential recipe details without scrolling through the article? Get our printable recipe card with just the ingredients and instructions.