Sweet Rice Cake Filled with Red Bean Paste, Ice Cream, or Fruit: The Chewy Treat You Can’t Stop Thinking About
Forget delicate desserts that look pretty and taste boring. Mochi is the snack that hits with texture, flavor, and surprise in every bite. Soft, stretchy rice dough hugging sweet red bean paste, creamy ice cream, or juicy fruit?
That’s not a treat—it’s an experience. You’ll steam, pound (figuratively), dust, and wrap like a pro in under an hour. And once you nail it, your kitchen becomes the mochi plug everyone texts at midnight.
Ready to flex?
What Makes This Special
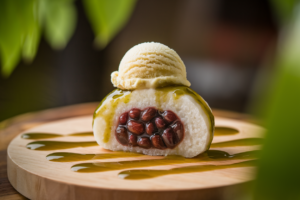
Mochi isn’t just dessert—it’s a culturally rich, tactile ritual. The dough is made from glutinous rice flour (mochiko), which gives that signature tender chew you can’t fake. It’s versatile, too: traditional anko (sweet red bean paste), trendy ice cream, or fresh fruit like strawberries all work like a charm.
It’s also incredibly customizable.
You can color the dough with matcha, beet powder, or cocoa; switch fillings; and tweak sweetness. Bonus: it’s naturally gluten-free since glutinous rice contains no gluten, despite the misleading name. And honestly, that pillowy bite?
Instant mood lift.
What You’ll Need (Ingredients)
- Glutinous rice flour (mochiko) – 1 cup
- Granulated sugar – 1/4 to 1/3 cup (adjust to taste)
- Water – 3/4 cup to 1 cup (start with 3/4 cup)
- Cornstarch or potato starch – for dusting
- Fillings (choose one or mix):
- Sweet red bean paste (anko) – 1 cup, rolled into 10–12 small balls
- Ice cream (any flavor) – 10–12 small scoops, pre-frozen solid
- Fresh fruit – strawberries, mango cubes, or sliced peaches, patted dry
- Optional flavor/boosters: pinch of salt, 1 tsp vanilla, 1–2 tsp matcha, drops of food coloring, or 1 tsp cocoa powder
Cooking Instructions
- Prep your filling first. For ice cream mochi, scoop small balls onto a tray and freeze rock solid (at least 1 hour). For red bean paste, roll teaspoon-sized balls. For fruit, wash, dry, and trim to bite-size.
Keep everything cold.
- Set up your dusting station. Generously dust a sheet pan or silicone mat with cornstarch/potato starch. You’ll transfer the hot dough here, so don’t skimp.
- Mix the mochi dough. In a microwave-safe bowl, whisk glutinous rice flour, sugar, and any flavorings. Slowly whisk in water until smooth and thick like pancake batter.
No lumps—your future self will thank you.
- Cook it (microwave method). Microwave on high for 1 minute. Stir. Microwave 1 more minute, stir again.
Microwave 30–60 seconds until the dough turns opaque, glossy, and sticky. It should pull from the bowl sides. If using stovetop/steam: steam the batter in a heatproof bowl for 12–15 minutes, stirring midway.
- Turn out and cool slightly. Using a spatula (lightly oiled or dusted), transfer the hot mochi onto the starch-dusted surface.
Dust the top generously. Let it cool until warm but pliable (about 5 minutes). Too hot = burns; too cold = impossible to shape.
- Flatten and portion. Pat the dough into a 1/4-inch-thick sheet using dusted hands or a rolling pin wrapped in plastic.
Cut into 10–12 circles (3–3.5 inches) using a cutter or a rim of a glass. If rustic is your vibe, just eyeball squares.
- Fill and seal. Place a filling ball in the center. Stretch the dough up and around, pinching edges together at the top to seal.
If it’s sticky, dust your fingers lightly; if it’s too dry, your dough was over-dusted or overcooked—work quickly and be gentle.
- Set and store. Place seam-side down on a starch-dusted tray. For ice cream mochi, return to the freezer immediately (30–60 minutes to firm). For red bean or fruit mochi, let stand 10 minutes to relax the dough.
- Serve. Ice cream mochi: temper 3–5 minutes before eating for that perfect bite.
Red bean/fruit mochi: serve at room temp the same day for best texture.
Storage Instructions
- Red bean or fruit mochi: Best eaten the day of. Store at room temp, covered, for up to 8 hours. For next-day, wrap individually and refrigerate up to 24 hours; texture may firm slightly.
- Ice cream mochi: Freeze individually wrapped in plastic, then store in an airtight container up to 2 weeks.
Let sit at room temp 2–5 minutes before serving.
- To refresh texture: For non-ice-cream mochi that’s firmed up, a 5–10 second microwave zap softens it. Don’t overdo it unless you want lava.
Health Benefits
- Gluten-free by nature: Made from glutinous rice flour (no gluten), a friendly option for those avoiding wheat-based desserts.
- Portion control built-in: Small, handheld pieces help manage calories while still satisfying a sweet tooth. Not saying it’s “diet food,” but it’s not a cake slab.
- Energy-dense carbs: Sticky rice provides quick energy—useful for athletes or busy days.
Pair with protein (green tea latte? yogurt?) for balance.
- Optional better-for-you swaps: Reduce sugar slightly, use fruit fillings, or add matcha for antioxidants. Incremental upgrades, big payoffs.
Common Mistakes to Avoid
- Using regular rice flour. You need glutinous rice flour (mochiko). Regular rice flour = crumbly sadness.
- Under- or overcooking the dough. Undercooked dough looks chalky and tears; overcooked turns rubbery.
Aim for glossy, stretchy, opaque.
- Skimping on dusting starch. Mochi sticks to everything like it’s auditioning for glue. Generous dusting prevents chaos.
- Warm fillings with ice cream mochi. If the ice cream isn’t rock solid, it melts instantly and breaks the seal. Freeze properly.
- Overfilling. More isn’t always more.
Too much stuffing = busted seams. Keep fillings small and uniform.
Mix It Up
- Matcha mochi: Add 1–2 teaspoons matcha to the dry ingredients for earthy, green goodness.
- Chocolate mochi: Add 1 teaspoon cocoa powder and fill with hazelnut spread or chocolate ice cream. Decadence unlocked.
- Strawberry daifuku (Ichigo Daifuku): Wrap a whole strawberry, optionally coated in a thin layer of red bean paste.
Fresh and iconic.
- Tropical twist: Use mango or lychee with coconut sugar in the dough. Coconut flakes outside? Yes, chef.
- Sesame flair: Mix toasted black sesame into anko or roll finished mochi lightly in sesame powder for nutty depth.
FAQ
Can I make mochi without a microwave?
Yes.
Steam the batter in a heatproof bowl over simmering water for 12–15 minutes, stirring halfway. The texture is fantastic—IMO slightly silkier.
What’s the difference between mochiko and shiratamako?
Both are glutinous rice flours, but mochiko is finely milled and easy to find, while shiratamako has a coarser granule that yields extra springy dough. Either works; adjust water slightly if needed.
How do I prevent the dough from tearing?
Cook until fully opaque and glossy, work while it’s still warm, and don’t overstretch.
Keep circles thicker rather than paper-thin. A tiny dab of water helps reseal small tears.
Is mochi safe for kids and older adults?
Mochi is chewy and can be a choking hazard. Serve small pieces, eat slowly, and pair with tea or water.
Safety first, deliciousness second—barely.
Why is my mochi grainy?
It’s likely undercooked or made with the wrong flour. Continue cooking until smooth and glossy. Also, fully dissolve sugar before heating to avoid grit.
Can I freeze non-ice-cream mochi?
You can, but the texture may toughen.
If you do, wrap individually and thaw at room temp. A quick 5-second microwave can help soften post-thaw.
How do I color mochi naturally?
Use matcha (green), beet powder (pink), turmeric (golden), or butterfly pea powder (blue). Add to dry ingredients and whisk thoroughly for even color.
Final Thoughts
Mochi is the rare dessert that balances comfort with creativity.
Once you’ve made the base dough a couple times, assembling your dream filling combo becomes second nature. Keep your station dusted, your ice cream cold, and your circles modest—simple moves, elite results. FYI: it’s dangerously easy to eat three.
Consider that your only warning.
Printable Recipe Card
Want just the essential recipe details without scrolling through the article? Get our printable recipe card with just the ingredients and instructions.
Printable Recipe Card
Want just the essential recipe details without scrolling through the article? Get our printable recipe card with just the ingredients and instructions.