Imagine the smell of toasted butter, warm apples, and molten caramel tagging you from across the room like a siren. That’s this Caramel Apple Tart—simple enough for a weeknight, sexy enough for a dinner party flex. No fussy lattice, no culinary school secrets—just a golden crust, tender apples, and a glossy caramel that tastes like autumn won the lottery.
If your dessert game needs an instant upgrade, this is your unfair advantage. Crisp bite, silky finish, mic drop.
Why You’ll Love This Recipe
- Big flavor, minimal fuss: A straightforward tart with bakery-level payoff. You’ll look wildly impressive with very little stress.
- Texture dream team: Buttery crust, tender apples, and a glossy caramel that clings in all the right ways.
- Reliable ingredients: Pantry staples plus apples—no niche ingredients or specialty tools needed.
- Flexible format: Make it rustic on a sheet pan or refined in a tart pan with a removable bottom.
Your call.
- Make-ahead friendly: Components can be prepped in stages, so you’re not chained to the oven at crunch time.
What Goes Into This Recipe – Ingredients
- Crust:
- 1 1/4 cups (160 g) all-purpose flour
- 2 tbsp granulated sugar
- 1/2 tsp fine sea salt
- 8 tbsp (113 g) cold unsalted butter, cubed
- 3–4 tbsp ice water
- Apple filling:
- 4–5 medium apples (Granny Smith + Honeycrisp combo is clutch), peeled, cored, thinly sliced
- 2 tbsp lemon juice
- 1/3 cup granulated sugar
- 2 tbsp light brown sugar
- 1 tsp ground cinnamon
- 1/8 tsp ground nutmeg
- 1/8 tsp kosher salt
- 1 tbsp cornstarch
- 1 tsp vanilla extract
- Caramel sauce:
- 3/4 cup granulated sugar
- 2 tbsp water
- 3 tbsp unsalted butter, room temp
- 1/2 cup heavy cream, warm
- Pinch of flaky sea salt (or 1/4 tsp fine sea salt)
- Finish:
- 1 egg beaten with 1 tsp water (egg wash)
- 1–2 tbsp coarse sugar (optional)
Cooking Instructions
- Make the crust: In a bowl, whisk flour, sugar, and salt. Cut in cold butter with a pastry cutter or fingertips until it resembles coarse crumbs with pea-sized bits. Drizzle in ice water, 1 tbsp at a time, tossing until dough just holds together.
- Chill the dough: Press into a disc, wrap, and chill 45–60 minutes.
Cold dough equals flaky results. Non-negotiable.
- Prep the apples: Toss sliced apples with lemon juice, sugars, cinnamon, nutmeg, salt, cornstarch, and vanilla. Let sit 10 minutes to draw out a little juice.
- Roll out the crust: On a lightly floured surface, roll to a 12-inch circle for a rustic galette or fit into a 9–10 inch tart pan.
If using a pan, trim excess and dock the base with a fork.
- Par-bake (optional but pro): For tart pan: line with parchment, add pie weights, and bake at 375°F (190°C) for 12 minutes. Remove weights and bake 5 more minutes. This keeps the bottom crisp under the apples.
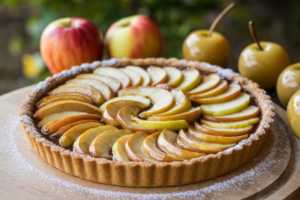
- Arrange apples: Fan slices in overlapping circles or scatter for a rustic vibe.
Pile them higher than you think; they’ll relax as they bake.
- Egg wash and sprinkle: Brush exposed crust with egg wash and, if you like, sprinkle coarse sugar on the edges for crunch.
- Bake: Bake at 375°F (190°C) for 35–45 minutes until apples are tender and the crust is deeply golden. If edges brown too fast, tent with foil.
- Make the caramel: While it bakes, add sugar and water to a light-colored saucepan. Cook over medium without stirring until syrup turns deep amber, 6–9 minutes.
Off heat, whisk in butter, then warm cream. Return to low heat, whisk smooth, and finish with salt. It should coat a spoon.
If it seizes, keep whisking on low—patience wins.
- Glaze and set: Let the tart cool 10 minutes. Drizzle about half the caramel over the apples. Save the rest for serving.
The caramel will thicken as it cools—science doing you a favor.
- Serve: Slice warm or at room temp. Finish with a pinch of flaky salt and a scoop of vanilla ice cream if you’re feeling legendary.
Preservation Guide
- Room temperature: Keeps 1 day, loosely covered, ideally in a cool spot. The crust stays crisper this way.
- Refrigerator: Store up to 4 days.
Rewarm slices at 325°F (165°C) for 10–12 minutes to revive the crust.
- Freezer: Freeze baked tart (without ice cream, obviously) tightly wrapped for up to 2 months. Thaw in the fridge overnight, then re-crisp at 350°F (175°C) for 12–15 minutes.
- Caramel sauce: Refrigerate in a jar up to 2 weeks. Warm gently in a microwave or over low heat until pourable.
Health Benefits
- Fiber from apples: Apples bring pectin, which can support digestion and help you feel fuller.
Dessert with benefits—yes, please.
- Antioxidants: Apples contain polyphenols that may support heart health. Cinnamon contributes anti-inflammatory compounds too.
- Controlled sweetness: This recipe relies on fruit + a measured caramel, not a sugar avalanche. You can dial it back slightly without ruining the magic.
- Portionable treat: Built-in portion control via slices.
Share with friends and you’ll look generous and stay balanced—win-win.
What Not to Do
- Don’t skip chilling the dough: Warm dough = greasy, tough crust. Cold dough = flaky layers.
- Don’t drown the apples: Overloading caramel before baking turns the base soggy. Glaze after, then add more at the table.
- Don’t slice apples too thick or too thin: Too thick, they stay crunchy; too thin, they collapse.
Aim for 1/8-inch slices.
- Don’t stir the caramel early: Stirring causes crystallization. Swirl the pan gently instead until you add butter and cream.
- Don’t forget a little salt: Salt unlocks flavor. Bland caramel is a tragedy we can avoid, IMO.
Mix It Up
- Nutty upgrade: Sprinkle toasted pecans or walnuts over the apples before the final caramel drizzle.
- Bourbon caramel: Add 1–2 tbsp bourbon after the cream, off heat.
Hello, smoky depth.
- Cheddar crust twist: Add 1/2 cup finely grated sharp cheddar to the flour before the butter. Apple-cheddar is elite, FYI.
- Spice swap: Trade cinnamon for cardamom or add a touch of allspice for a more complex warmth.
- Gluten-free: Use a 1:1 gluten-free flour blend and chill longer (60–90 minutes). Handle gently.
- Shortcut mode: Use store-bought puff pastry.
Dock it, pre-bake 10 minutes, top with apples, and finish as directed.
Can I make this ahead?
Yes. Make the dough up to 3 days ahead or freeze it for a month. You can also bake the tart earlier in the day and rewarm before serving.
Keep caramel separate and warm just before drizzling.
Which apples are best?
A mix of tart and sweet works best—Granny Smith for structure, Honeycrisp or Braeburn for sweetness and juice. Avoid mealy varieties like Red Delicious; they’ll ghost you in the oven.
Do I have to par-bake the crust?
Not mandatory, but it prevents sogginess, especially in a tart pan. For a rustic galette on a sheet pan, you can skip it if you bake on the lower rack and ensure good browning.
My caramel crystallized.
Can I save it?
Often, yes. Add a tablespoon of water and warm over low heat, gently swirling until smooth. If it’s a lost cause, start over and resist stirring until you add butter and cream.
Can I reduce the sugar?
You can cut the filling sugar by 1–2 tablespoons and make a slightly smaller batch of caramel.
Just don’t eliminate sugar entirely—it’s key for texture and browning.
How do I know when it’s done?
The crust should be deeply golden and the apples tender when pierced with a knife. You’ll see bubbling juices around the edges—a good sign the starch activated and the filling set.
My Take
This Caramel Apple Tart is the dessert equivalent of a power suit: confident, clean lines, and impossible to ignore. The par-baked crust keeps it sharp, while the warm, salted caramel ties everything together like a plot twist you actually wanted.
It’s forgiving, scalable, and dangerously habit-forming. Serve it once, and you’ll be “the tart person” forever—there are worse reputations to have.
Printable Recipe Card
Want just the essential recipe details without scrolling through the article? Get our printable recipe card with just the ingredients and instructions.
Printable Recipe Card
Want just the essential recipe details without scrolling through the article? Get our printable recipe card with just the ingredients and instructions.