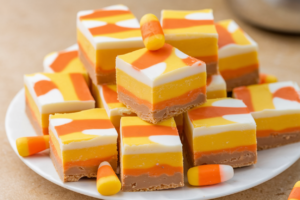
Layers of orange, yellow, and white fudge: The 3-Color Treat That Steals Every Party
Imagine a dessert that looks like a costume party, tastes like a cozy movie night, and takes less effort than choosing your Halloween playlist. That’s Candy Corn Fudge—bold stripes of orange, yellow, and white stacked into a nostalgic, bite-sized flex. This isn’t your grandma’s fudge (though she’ll ask for the recipe).
It’s fast, fun, and wildly photogenic. Make a batch for your next fall hangout and prepare for the “Wait, you made that?” messages to flood in.
What Makes This Special
This fudge nails the magic trick: no candy thermometer, yet it looks like you spent all afternoon crafting it. The layers are soft, creamy, and distinctly flavored without being cloying.
Bonus: it’s a killer make-ahead dessert that travels well and slices like a dream. Whether you love candy corn or just love the vibe, this fudge delivers both nostalgia and a pro-level presentation.
Ingredients Breakdown
- Sweetened condensed milk (14 oz can) – The creamy backbone that keeps everything smooth.
- White chocolate chips (24 oz total) – Use good-quality chips for best melting and flavor.
- Unsalted butter (3 tablespoons) – Adds richness and helps prevent dryness.
- Vanilla extract (2 teaspoons) – Classic flavor that ties the layers together.
- Almond extract (optional, 1/4 teaspoon) – Subtle candy-shop note. Optional but delightful.
- Fine sea salt (1/4 teaspoon) – Balances sweetness.
Don’t skip.
- Orange gel food coloring – For that vibrant top stripe.
- Yellow gel food coloring – For the cheerful middle stripe.
- Mini marshmallows (1 cup) – Optional, for extra pillowy texture.
- Sprinkles or candy corn (optional, for topping) – A little bling if you want it.
- Nonstick spray or butter – For prepping the pan.
- 8×8-inch square pan – The ideal size for thick, stackable layers.
- Heavy-bottomed saucepan + heatproof spatulas – For smooth melting and clean layer work.
- Parchment paper – Your new best friend for easy removal.
Let’s Get Cooking – Instructions
- Prep the pan. Line an 8×8-inch pan with parchment, leaving overhang on two sides for easy lifting. Lightly grease the parchment.
- Set up the base mixture. In a heavy saucepan over low heat, combine 14 oz sweetened condensed milk, 3 tablespoons butter, and 1/4 teaspoon fine sea salt. Stir until melted and warm, not bubbling.
- Add the chocolate. Stir in 24 oz white chocolate chips gradually, keeping the heat low.
Mix until completely smooth and glossy. If using marshmallows, fold in 1 cup now until just melted for extra creaminess.
- Flavor it. Remove from heat. Stir in 2 teaspoons vanilla and 1/4 teaspoon almond extract (if using).
- Divide the batch. Pour the fudge into three bowls: roughly 40% for white, 30% for yellow, 30% for orange.
The white layer should be the largest to mimic candy corn’s base.
- Color the layers. Leave the largest portion uncolored (white). Tint one bowl yellow and one bowl orange using gel food coloring. Start small—these pigments are potent.
Stir until evenly colored.
- Layer 1: White. Spread the uncolored mixture into the prepared pan. Smooth with an offset spatula. Tap the pan gently to release air bubbles.
Chill for 10–12 minutes until just set to the touch.
- Layer 2: Yellow. Warm the yellow bowl in the microwave at 50% power for 10–15 seconds if it’s thickening. Stir, then pour over the white layer. Smooth evenly.
Chill 10–12 minutes again.
- Layer 3: Orange. Repeat with the orange mixture. Smooth the top. If adding sprinkles or candy corn as a topping, press lightly into the surface now.
- Final set. Chill the assembled fudge for at least 2–3 hours, or until firm.
Overnight is even cleaner for slicing, FYI.
- Slice like a pro. Lift out using parchment. Warm a sharp knife under hot water, dry it, and slice into 1-inch squares or triangles to mimic candy corn points. Wipe the blade between cuts for crisp edges.
Storage Instructions
- Room temperature: Store in an airtight container for up to 5 days in a cool, dry spot.
- Refrigerator: Keeps up to 2 weeks.
Bring to room temp before serving for best texture.
- Freezer: Wrap tightly in parchment, then seal in a freezer bag or container. Freeze up to 2 months. Thaw overnight in the fridge.
- Layer protection: Place parchment between stacked pieces to prevent sticking and smudging.
Why This is Good for You
No, it’s not a salad.
But it is good for your social life, your holiday hosting confidence, and your stress levels. One pot, no thermometer, big payoff. It teaches patience and precision with those layers—skills you can flex on other desserts. Plus, sharing dessert boosts community vibes.
Science probably agrees (IMO).
What Not to Do
- Don’t overheat the chocolate. White chocolate scorches fast. Keep it low and slow.
- Don’t skip the chill time. Rushing the set leads to blended layers and sadness.
- Don’t use liquid food coloring. It can seize your fudge. Stick to gel or oil-based colors.
- Don’t layer while hot. Each layer should be barely warm and the pan layer set to the touch, or they’ll merge.
- Don’t guess measurements. White chocolate ratios matter.
Too little and it won’t set; too much and it’s chalky.
Alternatives
- Dairy-free: Use dairy-free sweetened condensed coconut milk and vegan white chocolate. Swap butter for coconut oil.
- Flavor swaps: Try orange extract in the orange layer, lemon in the yellow, and classic vanilla in the white for a citrus-pop trio.
- Texture add-ins: Fold in crushed vanilla wafers, toasted coconut, or chopped roasted almonds between layers for crunch.
- Color themes: Not into candy corn? Go ombré pinks, or team colors for game day.
The method stays the same.
- Less sweet: Add an extra pinch of salt and top with a whisper of flaky sea salt to balance the sugar.
- Microwave method: Combine condensed milk, butter, and chips in a large microwave-safe bowl. Heat at 50% power in 30-second bursts, stirring often, until smooth. Proceed with dividing and coloring.
FAQ
Can I use baking bars instead of chocolate chips?
Yes.
Chop them finely so they melt evenly. Choose real white chocolate with cocoa butter for the best texture and flavor.
My fudge is grainy—what went wrong?
Likely overheated chocolate or moisture contamination. Keep the heat low, stir gently, and avoid steam or water in the pan.
Using fresh, quality chips helps, too.
How do I get ultra-clean layers?
Let each layer set just enough to hold shape, but not rock hard—about 10–12 minutes in the fridge. Stir the next layer until smooth and barely warm before pouring, and spread gently without pressing down.
Can I double the recipe?
Absolutely. Use a 9×13-inch pan and add a few extra minutes to each chill step.
Keep your layers proportionally the same (largest white base, two equal color layers).
Is this safe to leave out at a party?
Yes, for several hours in a cool room. If it’s warm or sunny, keep it shaded and rotate batches from the fridge to keep edges sharp.
Do I need a candy thermometer?
Nope. This is a shortcut fudge.
Your only job is gentle heat and good stirring.
Can I reduce the sweetness?
White chocolate fudge is inherently sweet, but you can add extra salt, use a darker white chocolate (higher cocoa butter), or swirl in a thin layer of unsweetened peanut butter for contrast.
What if I don’t have gel food coloring?
Use oil-based candy colors. Avoid standard liquid dyes—they can seize the mixture and dull the texture.
Wrapping Up
Candy Corn Fudge is proof that simple can still hit like a showstopper. Three layers, low effort, big reveal—exactly the kind of recipe that earns you raving DMs and zero leftovers.
Make it for Halloween, Friendsgiving, or any “I need something wow” moment. It’s playful, creamy, and unapologetically festive. Go make the pan that disappears first.
Printable Recipe Card
Want just the essential recipe details without scrolling through the article? Get our printable recipe card with just the ingredients and instructions.
Printable Recipe Card
Want just the essential recipe details without scrolling through the article? Get our printable recipe card with just the ingredients and instructions.