These ghosts don’t haunt—they hustle. Four ingredients, one baking sheet, and you’ve got a Halloween party flex that looks pro and eats like a cloud. Crispy outside, marshmallowy inside, and so cute your guests will hesitate to bite… for like three seconds.
No fancy pastry school moves, just smart steps and a steady whisk. If you can draw a smiley face, you can make these.
What Makes This Special
Minimum ingredients, maximum wow. Egg whites, sugar, cream of tartar, and a dash of vanilla. That’s it.
The magic is in the technique and a slow bake that gives you glossy peaks and clean, ghostly shapes.
Kid-friendly fun. Piping ghost shapes is basically arts and crafts that you can eat. Let kids add faces with melted chocolate or edible markers. Zero stress, just joy.
Make-ahead brilliance. Bake these the day before, store them airtight, and show up like a snack genius.
They stay crisp and cute for days when stored right.
Allergen-friendly. Naturally gluten-free and dairy-free. Want them vegan? Aquafaba can sub in like a champ (see Mix It Up).
Shopping List – Ingredients
- 4 large egg whites (room temperature)
- 1 cup (200 g) superfine sugar (caster sugar works best; granulated can be pulsed finer)
- 1/2 tsp cream of tartar (for stability)
- 1 tsp pure vanilla extract (optional, but lovely)
- Pinch of fine salt (heightens flavor, optional)
- For decorating: 1/4 cup melted dark chocolate OR black edible food marker
- Equipment: Stand mixer or hand mixer, large clean metal or glass bowl, piping bag with round tip (or zip-top bag with corner snipped), parchment-lined baking sheet
Instructions
- Prep the oven and sheet. Preheat to 225°F (110°C).
Line a baking sheet with parchment. Dot the corners with a tiny dab of meringue (later) to keep parchment from sliding, FYI.
- Clean your gear. Any fat kills meringue. Wipe bowl and whisk with vinegar or lemon juice, then dry.
No yolks in the whites—none.
- Start the whip. Add egg whites to the bowl with cream of tartar and a pinch of salt. Beat on medium speed until foamy and opaque, about 1 minute.
- Sugar, slow and steady. With mixer running on medium-high, rain in the sugar 1 tablespoon at a time. Each addition should dissolve before the next (10–15 seconds between).
This is where gloss happens.
- Whip to stiff peaks. Keep beating 5–7 minutes total until the meringue is shiny, thick, and forms stiff peaks that stand straight without drooping. Rub a bit between fingers—if gritty, keep beating until smooth.
- Flavor. Beat in vanilla for 5 seconds. Don’t overmix after this.
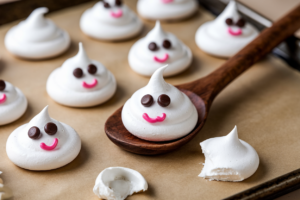
- Pipe the ghosts. Transfer meringue to a piping bag fitted with a large round tip.
Hold bag vertical and pipe a base circle, then a smaller mound on top, then a tiny top for a ghostly peak. Think snowman silhouette. Leave 1 inch between ghosts.
- Bake low and slow. Place sheet in the oven and bake for 75–90 minutes.
They shouldn’t brown. When done, they’ll lift easily from parchment and feel dry to the touch.
- Cool in the oven. Turn off heat, crack the oven door with a wooden spoon, and let ghosts cool inside for 45–60 minutes. This prevents cracks from temp shock.
- Add the spooky faces. Once cool, use melted chocolate (piped from a tiny-tip bag or toothpick) or a food marker to draw eyes and O-shaped mouths.
Mini chocolate chips work if you press them in while the meringue is just barely warm.
- Serve or store. Enjoy immediately or store airtight with a desiccant packet if you have one. Keep them dry and happy.
Preservation Guide
- Room temp storage: In an airtight container at cool room temp, meringues last 5–7 days. Humidity is the enemy; they’ll turn sticky if exposed to moisture.
- Layer smart: Use parchment between layers to avoid chipping faces or sticking.
Don’t stack too high.
- Freezing: You can freeze baked meringues for up to 1 month. Place in a rigid container, separated by parchment. Thaw in the sealed container at room temp to avoid condensation.
IMO, fresh is better.
- Reviving crispness: If they get tacky, rebake on a parchment-lined sheet at 200°F (95°C) for 10–15 minutes, then cool in the oven.
Benefits of This Recipe
- Budget-friendly showstopper: Eggs + sugar = party trick. Looks boutique-bakery without the invoice.
- Scalable: Double or halve easily. Keep the sugar-to-egg white ratio at about 50 g sugar per egg white.
- Texture win: Crisp shell with a tender, marshmallowy center.
If you want fully crisp, extend the bake by 10–15 minutes.
- Low-fat, gluten-free: Naturally light. Add color or decorations without changing macros too much.
- Creative outlet: Faces, shapes, mini bows, sprinkle “scarves”—have fun with it.
Avoid These Mistakes
- Fat contamination: A drop of yolk or greasy bowl equals sad, deflated meringue. Clean gear and separate eggs while cold, then bring whites to room temp.
- Adding sugar too fast: Dumping sugar in early causes weeping and graininess.
Slow feed it.
- High oven temp: Too hot = browning and cracks. Stick to 225°F (110°C) and be patient.
- Humidity: Rainy day? Run a dehumidifier or bake a few minutes longer.
Don’t cool on a damp countertop.
- Overmixing after peaks: Once stiff peaks form, stop. Overbeating breaks structure and creates clumps.
Mix It Up
- Vegan ghosts (Aquafaba): Substitute 1/2 cup (120 ml) aquafaba for egg whites. Whip 5 minutes to soft peaks, then add 3/4 cup (150 g) superfine sugar gradually with 1/4 tsp cream of tartar.
Bake the same; they may take 10–15 minutes longer to dry.
- Flavored spirits: Swap vanilla for almond extract (1/4 tsp) or peppermint (1/8 tsp—potent!).
- Color accents: Tint a small portion of meringue orange or purple and add tiny scarves or hats. Gel color only; liquid thins the batter.
- Chocolate-dipped: After baking, dip bases in melted chocolate and sprinkle with crushed cookies for “graveyard dirt.” Dramatic? Yes.
Delicious? Also yes.
- Mini size: Pipe bite-size ghosts and reduce bake time by 10–15 minutes. Perfect for cupcake toppers.
FAQ
Why are my meringues sticky?
Humidity or underbaking.
Extend bake by 10–15 minutes, then cool in the turned-off oven. Store airtight with a desiccant packet and avoid the fridge—fridges are humid.
Can I use regular granulated sugar?
Yes, but pulse it in a food processor for 10–15 seconds to make it finer. Superfine sugar dissolves faster and reduces grittiness and weeping.
Do I need cream of tartar?
It stabilizes the egg whites and helps achieve stiff peaks.
If you don’t have it, use 1/2 tsp lemon juice or white vinegar. The peaks may be slightly softer, but it still works.
How do I stop cracks?
Keep the oven low, avoid opening the door during baking, and cool gradually in the oven with the door cracked. Rapid temperature changes are the main culprit.
Can I make them ahead?
Absolutely.
Bake 1–2 days ahead and store airtight at room temperature. Add faces the day of serving if your kitchen is humid to keep lines crisp.
My meringue won’t reach stiff peaks. What now?
Check for fat contamination or sugar added too quickly.
Try adding a tiny pinch more cream of tartar and keep beating. Worst case, use the mixture for Eton mess—zero waste, still tasty.
How many ghosts does this make?
About 24 medium ghosts or 40 mini ghosts, depending on piping size. If you go jumbo, increase baking time slightly to dry the centers.
Is there a way to make them glossy white-white?
They’ll naturally be glossy if whipped properly.
Avoid browning by keeping the oven low and using light-colored baking sheets. A pinch of white gel color can brighten them if your sugar is slightly off-white.
The Bottom Line
Ghost Meringues are the easiest way to own Halloween dessert tables without breaking a sweat or the bank. With a clean bowl, patient sugar additions, and a low oven, you get crisp, ethereal bites that double as edible decor.
Customize faces, flavors, and sizes, then watch them “disappear.” Spooky? Not really. Irresistible? 100%.
Printable Recipe Card
Want just the essential recipe details without scrolling through the article? Get our printable recipe card with just the ingredients and instructions.
Printable Recipe Card
Want just the essential recipe details without scrolling through the article? Get our printable recipe card with just the ingredients and instructions.